Creating SimObjects in the memory system
In this chapter, we will create a simple memory object that sits between the CPU and the memory bus. In the next chapter we will take this simple memory object and add some logic to it to make it a very simple blocking uniprocessor cache.
gem5 master and slave ports
Before diving into the implementation of a memory object, we should first understand gem5’s master and slave port interface. As previously discussed in Creating a simple configuration script, all memory objects are connected together via ports. These ports provide a rigid interface between these memory objects.
These ports implement three different memory system modes: timing, atomic, and functional. The most important mode is timing mode. Timing mode is the only mode that produces correct simulation results. The other modes are only used in special circumstances.
Atomic mode is useful for fastforwarding simulation to a region of interest and warming up the simulator. This mode assumes that no events will be generated in the memory system. Instead, all of the memory requests execute through a single long callchain. It is not required to implement atomic accesses for a memory object unless it will be used during fastforward or during simulator warmup.
Functional mode is better described as debugging mode.
Functional mode is used for things like reading data from the host into the simulator memory.
It is used heavily in syscall emulation mode.
For instance, functional mode is used to load the binary in the process.cmd from the host into the simulated system’s memory so the simulated system can access it.
Functional accesses should return the most up-to-date data on a read, no matter where the data is, and should update all possible valid data on a write (e.g., in a system with caches there may be multiple valid cache blocks with the same address).
Packets
In gem5, Packets are sent across ports.
A Packet is made up of a MemReq which is the memory request object.
The MemReq holds information about the original request that initiated the packet such as the requestor, the address, and the type of request (read, write, etc.).
Packets also have a MemCmd, which is the current command of the packet.
This command can change throughout the life of the packet (e.g., requests turn into responses once the memory command is satisfied).
The most common MemCmd are ReadReq (read request), ReadResp (read response), WriteReq (write request), WriteResp (write response).
There are also writeback requests (WritebackDirty, WritebackClean) for caches and many other command types.
Packets also either keep the data for the request, or a pointer to the data. There are options when creating the packet whether the data is dynamic (explicitly allocated and deallocated), or static (allocated and deallocated by the packet object).
Finally, packets are used in the classic caches as the unit to track coherency. Therefore, much of the packet code is specific to the classic cache coherence protocol. However, packets are used for all communication between memory objects in gem5, even if they are not directly involved in coherence (e.g., DRAM controllers and the CPU models).
All of the port interface functions accept a Packet pointer as a parameter.
Since this pointer is so common, gem5 includes a typedef for it: PacketPtr.
Port interface
There are two types of ports in gem5: master ports and slave ports.
Whenever you implement a memory object, you will implement at least one of these types of ports.
To do this, you create a new class that inherits from either MasterPort or SlavePort for master and slave ports, respectively.
Master ports send requests (and receive response), and slave ports receive requests (and send responses).
Simple master-slave interaction when both can accept the request and the response. outlines the simplest interaction between a master and slave port. This figure shows the interaction in timing mode. The other modes are much simpler and use a simple callchain between the master and the slave.

Simple master-slave interaction when both can accept the request and the response.
As mentioned above, all of the port interfaces require a PacketPtr as a parameter.
Each of these functions (sendTimingReq, recvTimingReq, etc.), accepts a single parameter, a PacketPtr.
This packet is the request or response to send or receive.
To send a request packet, the master calls sendTimingReq.
In turn, (and in the same callchain), the function recvTimingReq is called on the slave with the same PacketPtr as its sole parameter.
The recvTimingReq has a return type of bool.
This boolean return value is directly returned to the calling master.
A return value of true signifies that the packet was accepted by the slave.
A return value of false, on the other hand, means that the slave was unable to accept and the request must be retried sometime in the future.
In Simple master-slave interaction when both can accept the request and the response., first, the master sends a timing request by calling sendTimingReq, which in turn calls recvTimingResp.
The slave, returns true from recvTimingResp, which is returned from the call to sendTimingReq.
The master continue executing, and the slave does whatever is necessary to complete the request (e.g., if it is a cache, it looks up the tags to see if there is a match to the address in the request).
Once the slave completes the request, it can send a response to the master.
The slave calls sendTimingResp with the response packet (this should be the same PacketPtr as the request, but it should now be a response packet).
In turn, the master function recvTimingResp is called.
The master’s recvTimingResp function returns true, which is the return value of sendTimingResp in the slave.
Thus, the interaction for that request is complete.
Later in Simple memory object example we will show the example code for these functions.
It is possible that the master or slave is busy when they receive a request or a response. Simple master-slave interaction when the slave is busy shows the case where the slave is busy when the original request was sent.
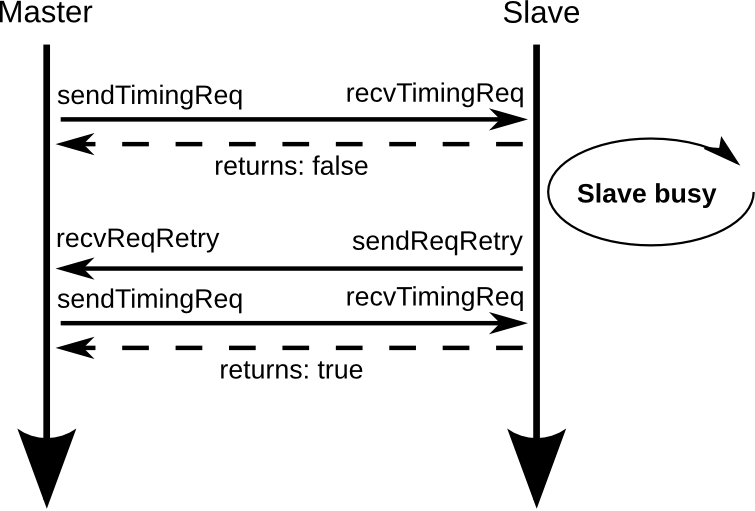
Simple master-slave interaction when the slave is busy
In this case, the slave returns false from the recvTimingReq function.
When a master receives false after calling sendTimingReq, it must wait until the its function recvReqRetry is executed.
Only when this function is called is the master allowed to retry calling sendTimingRequest.
The above figure shows the timing request failing once, but it could fail any number of times.
Note: it is up to the master to track the packet that fails, not the slave.
The slave does not keep the pointer to the packet that fails.
Similarly, Simple master-slave interaction when the master is busy shows the case when the master is busy at the time the slave tries to send a response.
In this case, the slave cannot call sendTimingResp until it receives a recvRespRetry.
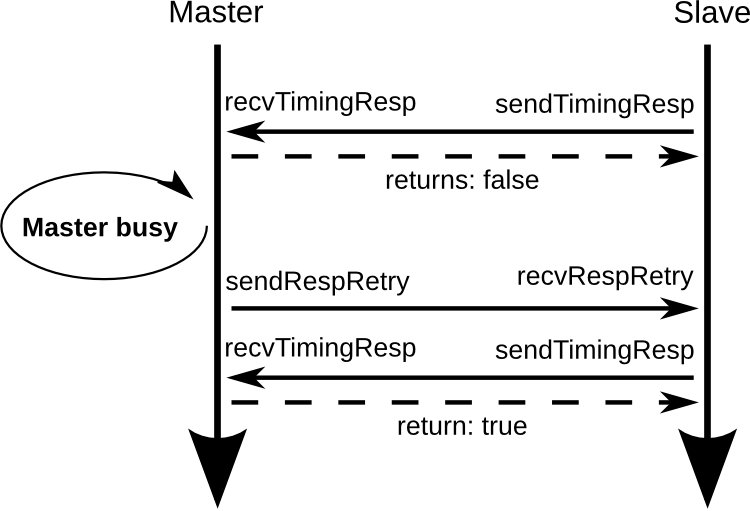
Simple master-slave interaction when the master is busy
Importantly, in both of these cases, the retry codepath can be a single call stack.
For instance, when the master calls sendRespRetry, recvTimingReq can also be called in the same call stack.
Therefore, it is easy to incorrectly create an infinite recursion bug, or other bugs.
It is important that before a memory object sends a retry, that it is ready at that instant to accept another packet.
Simple memory object example
In this section, we will build a simple memory object. Initially, it will simply pass requests through from the CPU-side (a simple CPU) to the memory-side (a simple memory bus). See Figure System with a simple memory object which sits between a CPU and the memory bus.. It will have a single master port, to send requests to the memory bus, and two cpu-side ports for the instruction and data cache ports of the CPU. In the next chapter, we will add the logic to make this object a cache.
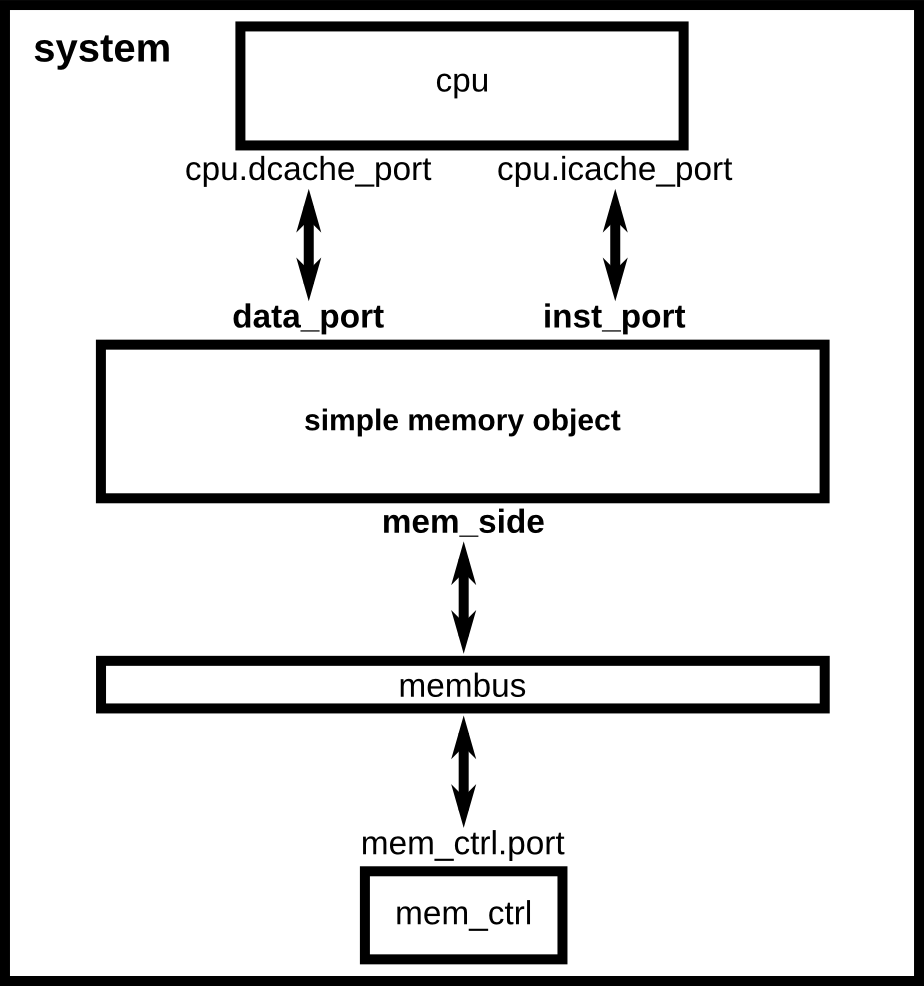
System with a simple memory object which sits between a CPU and the memory bus.
Declare the SimObject
Just like when we were creating the simple SimObject in Creating a very simple SimObject, the first step is to create a SimObject Python file.
We will call this simple memory object SimpleMemobj and create the SimObject Python file in src/learning_gem5/simple_memobj.
from m5.params import *
from m5.proxy import *
from MemObject import MemObject

class SimpleMemobj(MemObject):
    type = 'SimpleMemobj'
    cxx_header = "learning_gem5/simple_memobj/simple_memobj.hh"

    inst_port = SlavePort("CPU side port, receives requests")
    data_port = SlavePort("CPU side port, receives requests")
    mem_side = MasterPort("Memory side port, sends requests")
For this object, we inherit from MemObject, not SimObject since we are creating an object that will interact with the memory system.
The MemObject class has two pure virtual functions that we will have to define in our C++ implementation, getMasterPort and getSlavePort.
This object’s parameters are three ports. Two ports for the CPU to connect the instruction and data ports and a port to connect to the memory bus. These ports do not have a default value, and they have a simple description.
It is important to remember the names of these ports.
We will explicitly use these names when implementing SimpleMemobj and defining the getMasterPort and getSlavePort functions.
You can download the SimObject file here
Of course, you also need to create a SConscript file in the new directory as well that declares the SimObject Python file.
You can download the SConscript file here
Define the SimpleMemobj class
Now, we create a header file for SimpleMemobj.
class SimpleMemobj : public MemObject
{
  private:

  public:

    /** constructor
     */
    SimpleMemobj(SimpleMemobjParams *params);
};
Define a slave port type
Now, we need to define classes for our two kinds of ports: the CPU-side and the memory-side ports.
For this, we will declare these classes inside the SimpleMemobj class since no other object will ever use these classes.
Let’s start with the slave port, or the CPU-side port.
We are going to inherit from the SlavePort class.
The following is the required code to override all of the pure virtual functions in the SlavePort class.
class CPUSidePort : public SlavePort
{
  private:
    SimpleMemobj *owner;

  public:
    CPUSidePort(const std::string& name, SimpleMemobj *owner) :
        SlavePort(name, owner), owner(owner)
    { }

    AddrRangeList getAddrRanges() const override;

  protected:
    Tick recvAtomic(PacketPtr pkt) override { panic("recvAtomic unimpl."); }
    void recvFunctional(PacketPtr pkt) override;
    bool recvTimingReq(PacketPtr pkt) override;
    void recvRespRetry() override;
};
This object requires five functions to be defined.
-
AddrRangeList
getAddrRanges()¶ This function returns a list of the non-overlapping address ranges the owner is responsible for. All slave ports must override this function and return a populated list with at least one item. This is used by the crossbar objects to know which port to send requests to. Most memory objects will either return
AllMemoryor return whatever address range their peer responds to.
-
Tick
recvAtomic(PacketPtr pkt)¶ This is the function called whenever the CPU tries to make an atomic memory access. We are not going to implement this function for now. Instead, we will “panic” if this function is ever called.
panicexits the simulation and prints out the message.
-
void
recvFunctional(PacketPtr pkt)¶ Called when the CPU makes a functional access. As described above, this is used in syscall emulation mode for loading files off of the host file system.
-
bool
recvTimingReq(PacketPtr pkt)¶ This function is called when the peer to this port calls
sendTimingReq. It takes a single parameter which is the packet pointer for the request. This function returns true if the packet is accepted. If this function returns false, at some point in the future this object must callsendReqRetryso notify the peer port that it is able to accepted the rejected request.
-
void
recvRespRetry()¶ This function is called when the peer port calls
sendRespRetry. When this function is executed, this port should callsendTimingRespagain to retry sending the response to its peer master port.
This object also has a single member variable, its owner, so it can call functions on that object.
Define a master port type
Next, we need to define a master port type. This will be the memory-side port which will forward request from the CPU-side to the rest of the memory system.
class MemSidePort : public MasterPort
{
  private:
    SimpleMemobj *owner;

  public:
    MemSidePort(const std::string& name, SimpleMemobj *owner) :
        MasterPort(name, owner), owner(owner)
    { }

  protected:
    bool recvTimingResp(PacketPtr pkt) override;
    void recvReqRetry() override;
    void recvRangeChange() override;
};
This class only has three pure virtual functions that we must override.
-
bool
recvTimingResp(PacketPtr pkt)¶ This function is called when the slave peer to this port calls
sendTimingResp. If this object can accept the response, this function returns true. Otherwise, at some point in the future this object must callsendRespRetryto notify its peer that it it now capable of receiving the response.
-
void
recvReqRetry()¶ This function is called when the peer port calls
sendReqRetryand means this object should try resending a packet that previously failed.
-
void
recvRangeChange()¶ Similar to
sendRangeChangeabove, this function is called whenever the peer port wants to notify this object that the address ranges it accepts are changing. This function normally is only called during the initialization of the memory system and not while the simulation is executing.
Defining the MemObject interface
Now that we have defined these two new types CPUSidePort and MemSidePort, we can declare our three ports as part of SimpleMemobj.
We also need to declare the two pure virtual functions in the MemObject class, getMasterPort and getSlavePort.
These two functions are used by gem5 during the initialization phase to connect memory objects together via ports.
class SimpleMemobj : public MemObject
{
  private:

    <CPUSidePort declaration>
    <MemSidePort declaration>

    CPUSidePort instPort;
    CPUSidePort dataPort;

    MemSidePort memPort;

  public:
    SimpleMemobj(SimpleMemobjParams *params);

    BaseMasterPort& getMasterPort(const std::string& if_name,
                                  PortID idx = InvalidPortID) override;

    BaseSlavePort& getSlavePort(const std::string& if_name,
                                PortID idx = InvalidPortID) override;

};
You can download the header file for the SimpleMemobj here
Implementing basic MemObject functions
For the constructor of SimpleMemobj, we will simply call the MemObject constructor.
We also need to initialize all of the ports.
Each port’s constructor takes two parameters: the name and a pointer to its owner, as we defined in the header file.
The name can be any string, but by convention, it is the same name as in the Python SimObject file.
SimpleMemobj::SimpleMemobj(SimpleMemobjParams *params) :
    MemObject(params),
    instPort(params->name + ".inst_port", this),
    dataPort(params->name + ".data_port", this),
    memPort(params->name + ".mem_side", this)
{
}
Next, we need to implement the interfaces to get the ports.
This interface is made of two functions getMasterPort and getSlavePort.
These functions take two parameters.
The if_name is the Python variable name of the interface for this object.
In the case of the master port it will be mem_side since this is what we declared as a MasterPort in the Python SimObject file.
-
BaseMasterPort &
getMasterPort(const std::string &if_name, PortID idx)¶ This function is called when trying to connect a slave port to this object. The
if_nameis the Python variable name of the interface for this object. Theidxis the port number when using vector ports and isInvalidPortIDby default. This function returns a reference to a master port object.
-
BaseSlavePort &
getSlavePort(const std::string &if_name, PortID idx)¶ This function is called when trying to connect a master port to this object. The
if_nameis the Python variable name of the interface for this object. Theidxis the port number when using vector ports and isInvalidPortIDby default. This function returns a reference to a slave port object.
To implement getMasterPort, we compare the if_name and check to see if it is mem_side as specified in our Python SimObject file.
If it is, then we return the memPort object.
If not, then we pass the request name to our parent.
However, it will be an error if we try to connect a slave port to any other named port since the parent class has no ports defined.
BaseMasterPort&
SimpleMemobj::getMasterPort(const std::string& if_name, PortID idx)
{
    if (if_name == "mem_side") {
        return memPort;
    } else {
        return MemObject::getMasterPort(if_name, idx);
    }
}
To implement getSlavePort, we similarly check if the if_name matches either of the names we defined for our slave ports in the Python SimObject file.
If the name is "inst_port", then we return the instPort, and if the name is data_port we return the data port.
BaseSlavePort&
SimpleMemobj::getSlavePort(const std::string& if_name, PortID idx)
{
    if (if_name == "inst_port") {
        return instPort;
    } else if (if_name == "data_port") {
        return dataPort;
    } else {
        return MemObject::getSlavePort(if_name, idx);
    }
}
Implementing slave and master port functions
The implementation of both the slave and master port is relatively simple.
For the most part, each of the port functions just forwards the information to the main memory object (SimpleMemobj).
Starting with two simple functions, getAddrRanges and recvFunctional simply call into the SimpleMemobj.
AddrRangeList
SimpleMemobj::CPUSidePort::getAddrRanges() const
{
    return owner->getAddrRanges();
}

void
SimpleMemobj::CPUSidePort::recvFunctional(PacketPtr pkt)
{
    return owner->handleFunctional(pkt);
}
The implementation of these functions in the SimpleMemobj are equally simple.
These implementations just pass through the request to the memory side.
We can use DPRINTF calls here to track what is happening for debug purposes as well.
void
SimpleMemobj::handleFunctional(PacketPtr pkt)
{
    memPort.sendFunctional(pkt);
}

AddrRangeList
SimpleMemobj::getAddrRanges() const
{
    DPRINTF(SimpleMemobj, "Sending new ranges\n");
    return memPort.getAddrRanges();
}
Similarly for the MemSidePort, we need to implement recvRangeChange and forward the request through the SimpleMemobj to the slave port.
void
SimpleMemobj::MemSidePort::recvRangeChange()
{
    owner->sendRangeChange();
}
void
SimpleMemobj::sendRangeChange()
{
    instPort.sendRangeChange();
    dataPort.sendRangeChange();
}
Implementing receiving requests
The implementation of recvTimingReq is slightly more complicated.
We need to check to see if the SimpleMemobj can accept the request.
The SimpleMemobj is a very simple blocking structure; we only allow a single request outstanding at a time.
Therefore, if we get a request while another request is outstanding, the SimpleMemobj will block the second request.
To simplify the implementation, the CPUSidePort stores all of the flow-control information for the port interface.
Thus, we need to add an extra member variable, needRetry, to the CPUSidePort, a boolean that stores whether we need to send a retry whenever the SimpleMemobj becomes free.
Then, if the SimpleMemobj is blocked on a request, we set that we need to send a retry sometime in the future.
bool
SimpleMemobj::CPUSidePort::recvTimingReq(PacketPtr pkt)
{
    if (!owner->handleRequest(pkt)) {
        needRetry = true;
        return false;
    } else {
        return true;
    }
}
To handle the request for the SimpleMemobj, we first check if the SimpleMemobj is already blocked waiting for a response to another request.
If it is blocked, then we return false to signal the calling master port that we cannot accept the request right now.
Otherwise, we mark the port as blocked and send the packet out of the memory port.
For this, we can define a helper function in the MemSidePort object to hide the flow control from the SimpleMemobj implementation.
We will assume the memPort handles all of the flow control and always return true from handleRequest since we were successful in consuming the request.
bool
SimpleMemobj::handleRequest(PacketPtr pkt)
{
    if (blocked) {
        return false;
    }
    DPRINTF(SimpleMemobj, "Got request for addr %#x\n", pkt->getAddr());
    blocked = true;
    memPort.sendPacket(pkt);
    return true;
}
Next, we need to implement the sendPacket function in the MemSidePort.
This function will handle the flow control in case its peer slave port cannot accept the request.
For this, we need to add a member to the MemSidePort to store the packet in case it is blocked.
It is the responsibility of the sender to store the packet if the receiver cannot receive the request (or response).
This function simply send the packet by calling the function sendTimingReq.
If the send fails, then this object store the packet in the blockedPacket member function so it can send the packet later (when it receives a recvReqRetry).
This function also contains some defensive code to make sure there is not a bug and we never try to overwrite the blockedPacket variable incorrectly.
void
SimpleMemobj::MemSidePort::sendPacket(PacketPtr pkt)
{
    panic_if(blockedPacket != nullptr, "Should never try to send if blocked!");
    if (!sendTimingReq(pkt)) {
        blockedPacket = pkt;
    }
}
Next, we need to implement the code to resend the packet.
In this function, we try to resend the packet by calling the sendPacket function we wrote above.
void
SimpleMemobj::MemSidePort::recvReqRetry()
{
    assert(blockedPacket != nullptr);

    PacketPtr pkt = blockedPacket;
    blockedPacket = nullptr;

    sendPacket(pkt);
}
Implementing receiving responses
The response codepath is similar to the receiving codepath.
When the MemSidePort gets a response, we forward the response through the SimpleMemobj to the appropriate CPUSidePort.
bool
SimpleMemobj::MemSidePort::recvTimingResp(PacketPtr pkt)
{
    return owner->handleResponse(pkt);
}
In the SimpleMemobj, first, it should always be blocked when we receive a response since the object is blocking.
Before sending the packet back to the CPU side, we need to mark that the object no longer blocked.
This must be done before calling ``sendTimingResp``.
Otherwise, it is possible to get stuck in an infinite loop as it is possible that the master port has a single callchain between receiving a response and sending another request.
After unblocking the SimpleMemobj, we check to see if the packet is an instruction or data packet and send it back across the appropriate port.
Finally, since the object is now unblocked, we may need to notify the CPU side ports that they can now retry their requests that failed.
bool
SimpleMemobj::handleResponse(PacketPtr pkt)
{
    assert(blocked);
    DPRINTF(SimpleMemobj, "Got response for addr %#x\n", pkt->getAddr());

    blocked = false;

    // Simply forward to the memory port
    if (pkt->req->isInstFetch()) {
        instPort.sendPacket(pkt);
    } else {
        dataPort.sendPacket(pkt);
    }

    instPort.trySendRetry();
    dataPort.trySendRetry();

    return true;
}
Similar to how we implemented a convenience function for sending packets in the MemSidePort, we can implement a sendPacket function in the CPUSidePort to send the responses to the CPU side.
This function calls sendTimingResp which will in turn call recvTimingResp on the peer master port.
If this call fails and the peer port is currently blocked, then we store the packet to be sent later.
void
SimpleMemobj::CPUSidePort::sendPacket(PacketPtr pkt)
{
    panic_if(blockedPacket != nullptr, "Should never try to send if blocked!");

    if (!sendTimingResp(pkt)) {
        blockedPacket = pkt;
    }
}
We will send this blocked packet later when we receive a recvRespRetry.
This function is exactly the same as the recvReqRetry above and simply tries to resend the packet, which may be blocked again.
void
SimpleMemobj::CPUSidePort::recvRespRetry()
{
    assert(blockedPacket != nullptr);

    PacketPtr pkt = blockedPacket;
    blockedPacket = nullptr;

    sendPacket(pkt);
}
Finally, we need to implement the extra function trySendRetry for the CPUSidePort.
This function is called by the SimpleMemobj whenever the SimpleMemobj may be unblocked.
trySendRetry checks to see if a retry is needed which we marked in recvTimingReq whenever the SimpleMemobj was blocked on a new request.
Then, if the retry is needed, this function calls sendRetryReq, which in turn calls recvReqRetry on the peer master port (the CPU in this case).
void
SimpleMemobj::CPUSidePort::trySendRetry()
{
    if (needRetry && blockedPacket == nullptr) {
        needRetry = false;
        DPRINTF(SimpleMemobj, "Sending retry req for %d\n", id);
        sendRetryReq();
    }
}
You can download the implementation for the SimpleMemobj here
The following figure, Interaction between SimpleMemobj and its ports, shows the relationships between the CPUSidePort, MemSidePort, and SimpleMemobj.
This figure shows how the peer ports interact with the implementation of the SimpleMemobj.
Each bold function is one that we had to implement, and the non-bold functions are the port interfaces to the peer ports.
The colors highlight one API path through the object (e.g., receiving a request or updating the memory ranges).
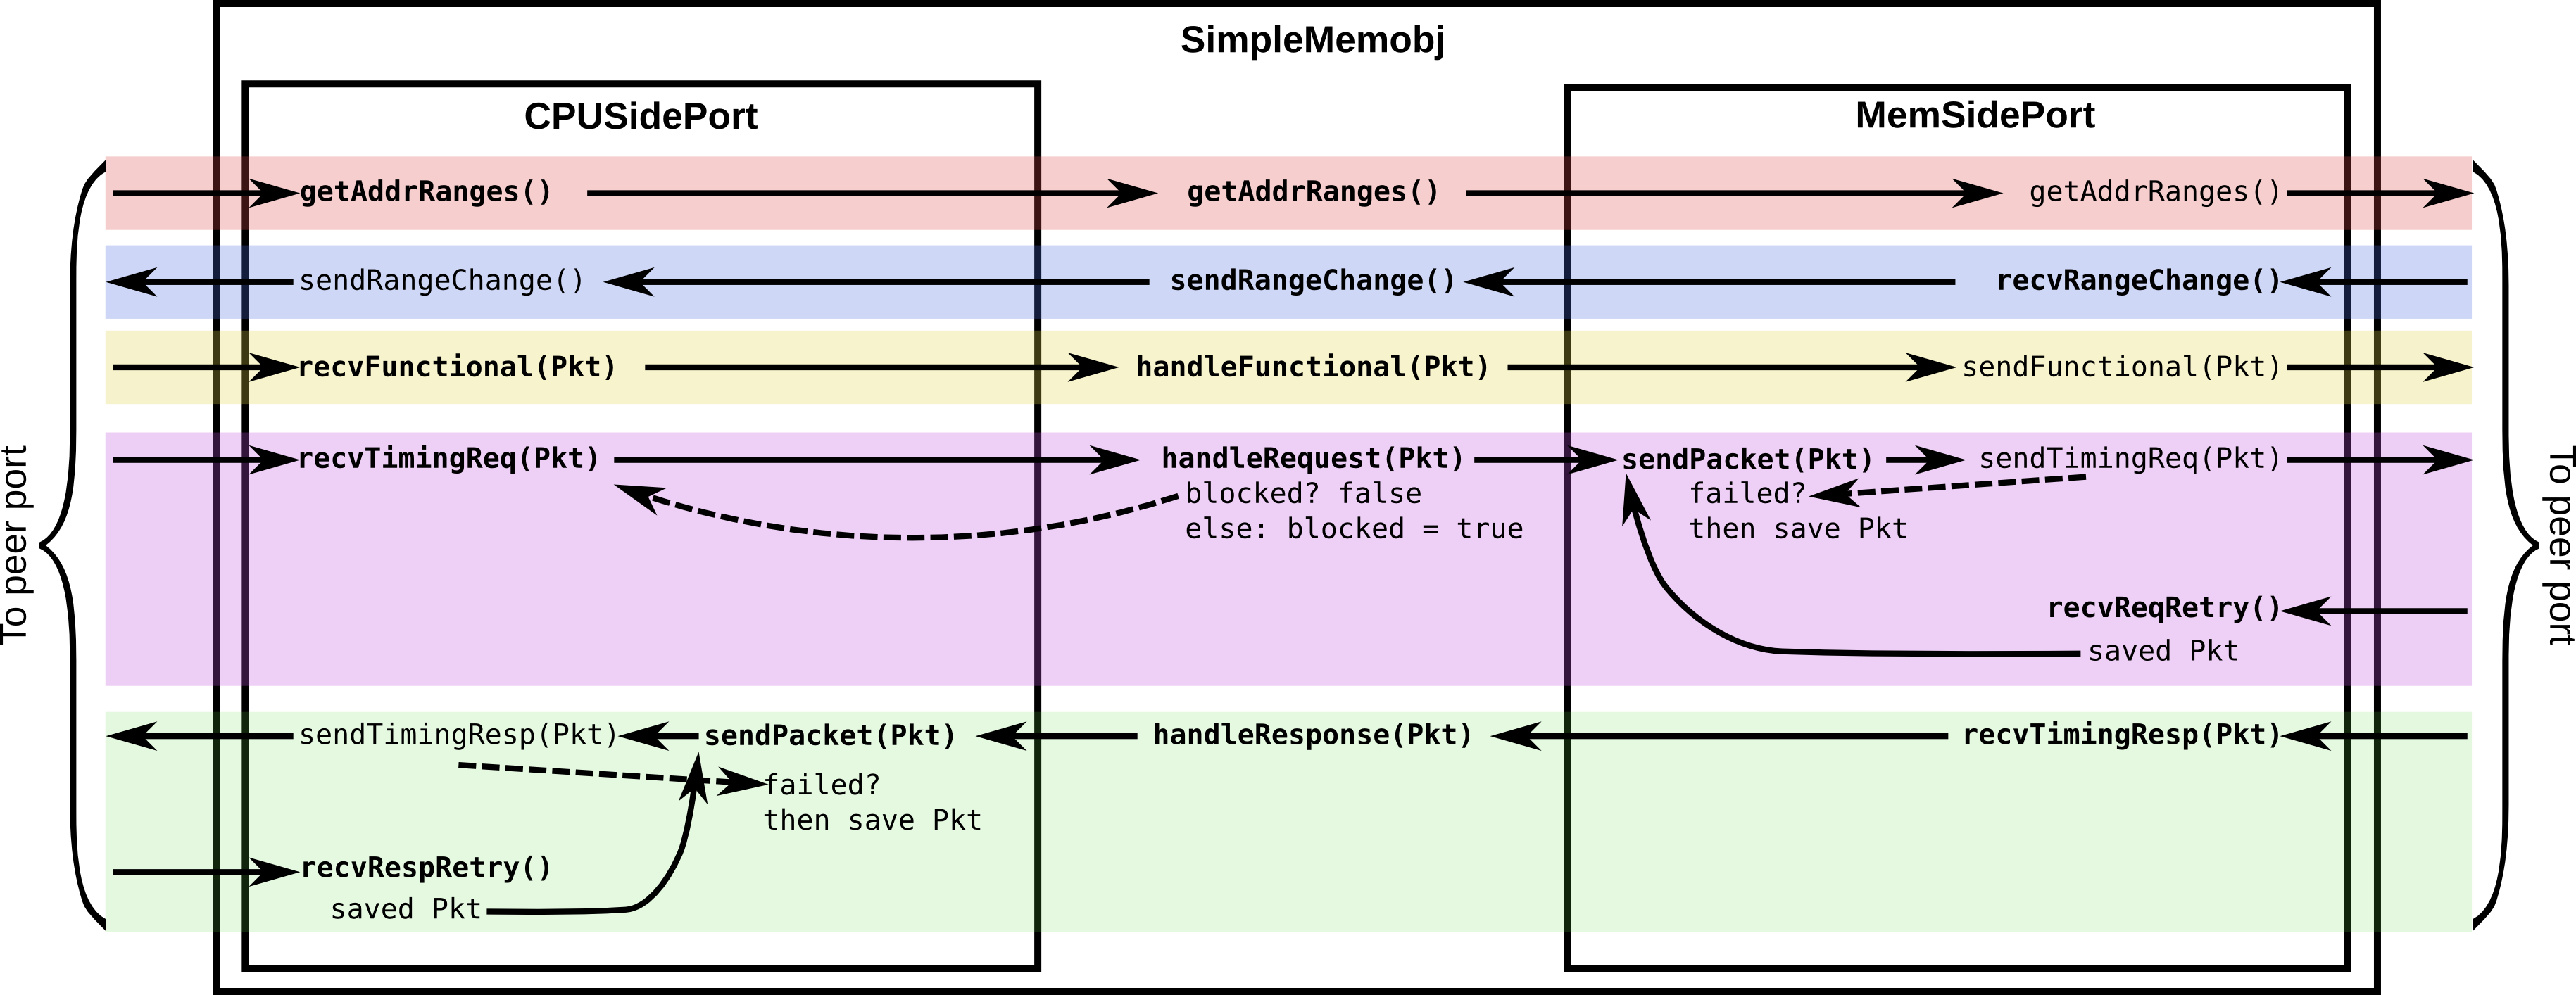
Interaction between SimpleMemobj and its ports
For this simple memory object, packets are just forwarded from the CPU-side to the memory side.
However, by modifying handleRequest and handleResponse, we can create rich featureful objects, like a cache in the next chapter.
Create a config file
This is all of the code needed to implement a simple memory object! In the next chapter, we will take this framework and add some caching logic to make this memory object into a simple cache. However, before that, let’s look at the config file to add the SimpleMemobj to your system.
This config file builds off of the simple config file in Creating a simple configuration script.
However, instead of connecting the CPU directly to the memory bus, we are going to instantiate a SimpleMemobj and place it between the CPU and the memory bus.
import m5
from m5.objects import *

system = System()
system.clk_domain = SrcClockDomain()
system.clk_domain.clock = '1GHz'
system.clk_domain.voltage_domain = VoltageDomain()
system.mem_mode = 'timing'
system.mem_ranges = [AddrRange('512MB')]

system.cpu = TimingSimpleCPU()

system.memobj = SimpleMemobj()

system.cpu.icache_port = system.memobj.inst_port
system.cpu.dcache_port = system.memobj.data_port

system.membus = SystemXBar()

system.memobj.mem_side = system.membus.slave

system.cpu.createInterruptController()
system.cpu.interrupts[0].pio = system.membus.master
system.cpu.interrupts[0].int_master = system.membus.slave
system.cpu.interrupts[0].int_slave = system.membus.master

system.mem_ctrl = DDR3_1600_8x8()
system.mem_ctrl.range = system.mem_ranges[0]
system.mem_ctrl.port = system.membus.master

system.system_port = system.membus.slave

process = Process()
process.cmd = ['tests/test-progs/hello/bin/x86/linux/hello']
system.cpu.workload = process
system.cpu.createThreads()

root = Root(full_system = False, system = system)
m5.instantiate()

print "Beginning simulation!"
exit_event = m5.simulate()
print 'Exiting @ tick %i because %s' % (m5.curTick(), exit_event.getCause())
You can download this config script here
Now, when you run this config file you get the following output.
gem5 Simulator System.  http://gem5.org
gem5 is copyrighted software; use the --copyright option for details.

gem5 compiled Jan  5 2017 13:40:18
gem5 started Jan  9 2017 10:17:17
gem5 executing on chinook, pid 5138
command line: build/X86/gem5.opt configs/learning_gem5/part2/simple_memobj.py

Global frequency set at 1000000000000 ticks per second
warn: DRAM device capacity (8192 Mbytes) does not match the address range assigned (512 Mbytes)
0: system.remote_gdb.listener: listening for remote gdb #0 on port 7000
warn: CoherentXBar system.membus has no snooping ports attached!
warn: ClockedObject: More than one power state change request encountered within the same simulation tick
Beginning simulation!
info: Entering event queue @ 0.  Starting simulation...
Hello world!
Exiting @ tick 507841000 because target called exit()
If you run with the SimpleMemobj debug flag, you can see all of the memory requests and responses from and to the CPU.
gem5 Simulator System.  http://gem5.org
gem5 is copyrighted software; use the --copyright option for details.

gem5 compiled Jan  5 2017 13:40:18
gem5 started Jan  9 2017 10:18:51
gem5 executing on chinook, pid 5157
command line: build/X86/gem5.opt --debug-flags=SimpleMemobj configs/learning_gem5/part2/simple_memobj.py

Global frequency set at 1000000000000 ticks per second
Beginning simulation!
info: Entering event queue @ 0.  Starting simulation...
      0: system.memobj: Got request for addr 0x190
  77000: system.memobj: Got response for addr 0x190
  77000: system.memobj: Got request for addr 0x190
 132000: system.memobj: Got response for addr 0x190
 132000: system.memobj: Got request for addr 0x190
 187000: system.memobj: Got response for addr 0x190
 187000: system.memobj: Got request for addr 0x94e30
 250000: system.memobj: Got response for addr 0x94e30
 250000: system.memobj: Got request for addr 0x190
 ...
You may also want to change the CPU model to the out-of-order model (DerivO3CPU).
When using the out-of-order CPU you will potentially see a different address stream since it allows multiple memory requests outstanding at a once.
When using the out-of-order CPU, there will now be many stalls because the SimpleMemobj is blocking.
